I want to share a little feature that I recently added to my Brackets theme package and explain how it can be used with any other theme: animated fold buttons. It is just a little gimmick. But it’s cool 
Here is what the result looks like (with "ui_scale": 2 for this preview image and with 60 Hz display refresh ratio):
The following steps describe how you can add the animated buttons to the built-in Default theme.
Themes in Sublime Text use PNG images for the shapes/buttons/icons, so as the first step we need to prepare PNG images for the individual animation frames. You can skip the next instructions and download the resulting images directly from my theme, if you want. I use an image size of 16×16 pixels, which is also the size used in the Default, Default Dark and Adaptive themes. Using a simple triangle shape for the buttons, the images can be created by hand in SVG format, which will then also make it easy to generate the rotated images for the animation.
fold_closed.svg (triangle pointing to the right)
<svg xmlns="http://www.w3.org/2000/svg" viewBox="0 0 16 16" fill="white">
    <path d="M 7,13 7,3 16,8 z"/>
</svg>
fold_opened.svg (triangle pointing down)
<svg xmlns="http://www.w3.org/2000/svg" viewBox="0 0 16 16" fill="white">
    <path d="M 5,5 15,5 10,14 z"/>
</svg>
It is useful to choose integer coordinates for the triangle corners, so that the “main” (horizontal or vertical) edge of the rendered triangle will have full opacity and won’t appear blurry. Here, the coordinates for the rightwards pointing triangle are (7,13), (7,3), (16,8), and they were chosen so that the geometric center, which we will use as the rotation point, also has integer coordinates (in this case (10,8)). The advantage of this is, that the corner coordinates of the triangle rotated by 90° will then also have integer coordinates. These triangles are slightly bigger than those used in the built-in themes, but the difference is barely noticeable.
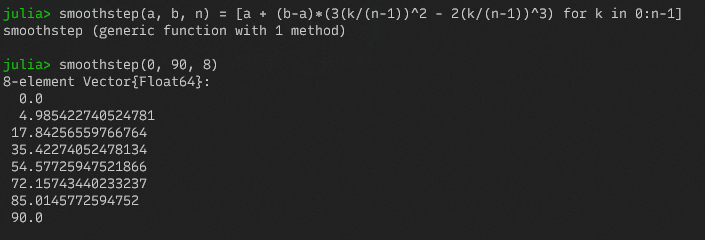
Next, we can create the animation frames by adding the rotate transform function to the SVG path in the initial triangle. I use 6 additional interpolation frames between the opened and closed states from above. To calculate the rotation angles, I used the smoothstep function to interpolate between 0 and 90 degrees:
But of course you could also use a simple linear interpolation instead, or another interpolation method.
The resulting files for the interpolated frames are named fold1 to fold6:
fold1.svg
<svg xmlns="http://www.w3.org/2000/svg" viewBox="0 0 16 16" fill="white">
    <path transform="rotate(4.985 10 8)" d="M 7,13 7,3 16,8 z"/>
</svg>
fold2.svg
<svg xmlns="http://www.w3.org/2000/svg" viewBox="0 0 16 16" fill="white">
    <path transform="rotate(17.843 10 8)" d="M 7,13 7,3 16,8 z"/>
</svg>
fold3.svg
<svg xmlns="http://www.w3.org/2000/svg" viewBox="0 0 16 16" fill="white">
    <path transform="rotate(35.423 10 8)" d="M 7,13 7,3 16,8 z"/>
</svg>
fold4.svg
<svg xmlns="http://www.w3.org/2000/svg" viewBox="0 0 16 16" fill="white">
    <path transform="rotate(54.577 10 8)" d="M 7,13 7,3 16,8 z"/>
</svg>
fold5.svg
<svg xmlns="http://www.w3.org/2000/svg" viewBox="0 0 16 16" fill="white">
    <path transform="rotate(72.157 10 8)" d="M 7,13 7,3 16,8 z"/>
</svg>
fold6.svg
<svg xmlns="http://www.w3.org/2000/svg" viewBox="0 0 16 16" fill="white">
    <path transform="rotate(85.015 10 8)" d="M 7,13 7,3 16,8 z"/>
</svg>
To generate PNG images (in 3 sizes for different UI scales) from the SVG files, you can for example use Inkscape. Just put this into a Batch file or ShellScript and run it, assuming that the inkscape executable is on your PATH:
inkscape --export-type=png -w 16 -h 16 --export-filename=fold_closed.png fold_closed.svg
inkscape --export-type=png -w 32 -h 32 --export-filename=fold_closed@2x.png fold_closed.svg
inkscape --export-type=png -w 48 -h 48 --export-filename=fold_closed@3x.png fold_closed.svg
inkscape --export-type=png -w 16 -h 16 --export-filename=fold_opened.png fold_opened.svg
inkscape --export-type=png -w 32 -h 32 --export-filename=fold_opened@2x.png fold_opened.svg
inkscape --export-type=png -w 48 -h 48 --export-filename=fold_opened@3x.png fold_opened.svg
inkscape --export-type=png -w 16 -h 16 --export-filename=fold1.png fold1.svg
inkscape --export-type=png -w 32 -h 32 --export-filename=fold1@2x.png fold1.svg
inkscape --export-type=png -w 48 -h 48 --export-filename=fold1@3x.png fold1.svg
inkscape --export-type=png -w 16 -h 16 --export-filename=fold2.png fold2.svg
inkscape --export-type=png -w 32 -h 32 --export-filename=fold2@2x.png fold2.svg
inkscape --export-type=png -w 48 -h 48 --export-filename=fold2@3x.png fold2.svg
inkscape --export-type=png -w 16 -h 16 --export-filename=fold3.png fold3.svg
inkscape --export-type=png -w 32 -h 32 --export-filename=fold3@2x.png fold3.svg
inkscape --export-type=png -w 48 -h 48 --export-filename=fold3@3x.png fold3.svg
inkscape --export-type=png -w 16 -h 16 --export-filename=fold4.png fold4.svg
inkscape --export-type=png -w 32 -h 32 --export-filename=fold4@2x.png fold4.svg
inkscape --export-type=png -w 48 -h 48 --export-filename=fold4@3x.png fold4.svg
inkscape --export-type=png -w 16 -h 16 --export-filename=fold5.png fold5.svg
inkscape --export-type=png -w 32 -h 32 --export-filename=fold5@2x.png fold5.svg
inkscape --export-type=png -w 48 -h 48 --export-filename=fold5@3x.png fold5.svg
inkscape --export-type=png -w 16 -h 16 --export-filename=fold6.png fold6.svg
inkscape --export-type=png -w 32 -h 32 --export-filename=fold6@2x.png fold6.svg
inkscape --export-type=png -w 48 -h 48 --export-filename=fold6@3x.png fold6.svg
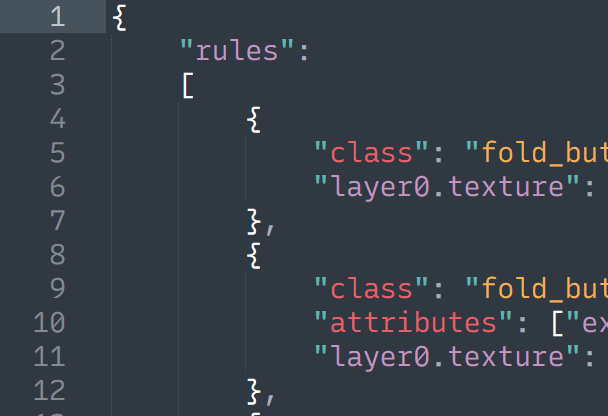
Open the packages directory via Preferences: Browse Packages from the command palette, create a folder with the same name of the theme package (here: Theme - Default), and place the PNG files into that folder.
Now we need to add a small customization to the used theme, so that it picks up those files and displays them as an animation. Select UI: Customize Theme from the command palette, and add the following customization rules to the righthand side:
{
    "rules":
    [
        {
            "class": "fold_button_control",
            "layer0.texture": "Theme - Default/fold_closed.png",
            "content_margin": 8  // 16 x 16 pixel
        },
        {
            "class": "fold_button_control",
            "attributes": ["expanded"],
            "layer0.texture": "Theme - Default/fold_opened.png"
        },
        {
            "class": "fold_button_control",
            "settings": ["animation_enabled"],
            "attributes": ["!expanded", "pressed", "hover"],
            "layer0.texture": {
                "keyframes": [
                    "Theme - Default/fold1.png",
                    "Theme - Default/fold2.png",
                    "Theme - Default/fold3.png",
                    "Theme - Default/fold4.png",
                    "Theme - Default/fold5.png",
                    "Theme - Default/fold6.png",
                    "Theme - Default/fold_opened.png"
                ],
                "loop": false,
                "frame_time": 0.0166  // 60 Hz
            }
        },
        {
            "class": "fold_button_control",
            "settings": ["animation_enabled"],
            "attributes": ["expanded", "pressed", "hover"],
            "layer0.texture": {
                "keyframes": [
                    "Theme - Default/fold6.png",
                    "Theme - Default/fold5.png",
                    "Theme - Default/fold4.png",
                    "Theme - Default/fold3.png",
                    "Theme - Default/fold2.png",
                    "Theme - Default/fold1.png",
                    "Theme - Default/fold_closed.png"
                ],
                "loop": false,
                "frame_time": 0.0166  // 60 Hz
            }
        },
    ]
}
Of course the file paths should match the places where you have put the PNG files. You can also put them somewhere else, e.g. into your User package, if you want, and change the paths accordingly.
Note that if the duration of the mouse click is very short (i.e. shorter than 7×0.0166s ≈ 0.1s), then not all of the frames might be shown, and the button abruptly jumps to the end state. This is because the theme rules from above for the animation are active only for the time when the current state is “pressed” (and I think there is no better way to do it, because theme rules are applied based on current state of attributes, and not based on attribute state changes). But the difference even when that happens shouldn’t really be noticeable.