Sublime Forum

Highlighting comments to myself

#1

This may not be possible out of the box, but I’d appreciate any pointers.

I’m using ST3 for writing prose (well, I WIILL once I finish having fun tweaking it). I tend to leave notes for myself in the text, like this: <check this fact. don’t forget to do this or that.>. I’d like to write a macro to help set my notes off, visually, from the main text.

The ideal would be for me to hit a key combo–let’s say super+c–and into the text would be inserted a pair of angle bracket, and the cursor would be between them; I would then type my note. BUT, the whole thing would have a different background and foreground color than my usual writing color scheme–heck, maybe even a different font. Then once I’ve written my note and I mouse-click out of that bracketed area, I’m back in the regular text and ready to keep writing.

I have a feeling this might need to be a plug-in, but not sure. Any thoughts?

0 Likes

Combining syntax definition with an earlier syntax tweak
#2

Sublime doesn’t support the idea of multiple fonts inside of the same file, so that part is not possible, but the rest is and a plugin isn’t required at all (though of course, you might need one eventually once the ideas start flowing for other things you might want to do :smiley:).

You can create a key binding to insert the text you want, and a combination of a custom syntax definition and a tweak to your color scheme can alter the colors of things as well.

As a simple example, here’s something to get you started. Where the User package is mentioned below, you can find that location by using Preferences > Browse Packages... from the menu or the command palette.

First, a simple syntax definition that you can save into your User package as a sublime-syntax file (here I used Prose.sublime-syntax):

%YAML 1.2
---
# See http://www.sublimetext.com/docs/3/syntax.html
file_extensions:
  - prose
scope: text.prose
name: My Prose File Type
contexts:
  main:
    - match: '<'
      scope: punctuation.definition.note.begin
      push: note

  note:
    - meta_scope: note.text
    - match: '>'
      scope: punctuation.definition.note.end
      pop: true

This simple syntax applies to files with an extension of prose and recognizes that when it sees a < character, that character and everything up to a matching > character is special and should be treated as such.

Once you put the syntax in place, you can open a .prose file or use the command palette to select the Set Syntax: My Prose File Type command to set the syntax for a buffer, and start typing.

In order to actually visually distinguish notes, you need to have a rule in your color scheme to do so (alternately you can use an existing scope for this, but most color schemes tend to not apply different background colors for anything other than errors, which is probably a bit more vibrant than you want).

To so that, you can create a file like this in your User package. The name of the file has to be named for your current color scheme (visible in the preferences). The extension should always be sublime-color-scheme. Here I’ve named the file Monokai.sublime-color-scheme because that’s what the default color scheme in ST3 is:

{
    "rules":
    [
        {
            "scope": "text.prose note",
            "foreground": "red",
            "background": "darkblue",
        },
    ]
}

Here of course you’d set the colors as appropriate. You can also use font_style to apply bold and/or italic to the note (or, if you’re using the ST4 beta, you can also make it glow or underline as well).

All that’s left is the key that inserts the note, which would look something like the following (here I chose a different key because I’m on Windows and there’s already a system binding on super+c):

    { "keys": ["ctrl+alt+c"], "command": "insert_snippet",
       "args": {
          "contents": "<$0>"
       },
       "context": [
           { "key": "selector", "operator": "equal", "operand": "text.prose" },
       ],
    },

This says that when you press the key in a prose file, the text <> should be inserted, and the cursor ($0) should be between them. Then you can type away:

You can find more information about syntaxes, color schemes (and modifying them) and key bindings (and context on them) in the official documentation and in the unofficial documenation (which also covers snippets).

I also have videos on snippets, key bindings, key binding contexts and a whole series of videos on color schemes on my YouTube channel as well.

This just scratches the surface of things you can do as well. If you need any assistance, the forum is a great place to ask, as well as the discord server (there’s a link in the Resources and Bug Tracking pinned thread), where you can usually get a more “live” back and forth experience, which can come in handy at times.

5 Likes

#3

Holy cow, this is awesome! This is just the kind of thing I had in mind. I plan to work through it tomorrow morning–will learn about syntax definitions and follow your lead from there. I believe I can get my head around it over a couple cups of coffee. Thank you so much.

I know what you mean about flowing ideas leading to other things: If I stick with it, I’ll no doubt eventually dip a toe into plug-in creation. I’ve dabbled with beginner Python in the past, so it’s not completely foreign to me, but I’d have a definite learning curve. And all this fun tweaking and setup means I don’t have to settle down to the drudgery of actually writing just yet. :smile:

I will look into that discord channel as well. Sounds like I should probably be on there.

Thank you again for your time and help.

1 Like

#4

All right, my friend, I’m in business. :smiley:

Since I’m using ST pretty much exclusively for writing txt files, I wrote the syntax definition for txt instead of prose (please let me know if you think that was unwise). Also tweaked the tag just a bit, and voila, it’s behaving beautifully:

Screenshot%20from%202020-11-14%2009-33-03

Again–Thanks!

ps: I also joined the discord channel… will mostly be a lurker for a while, I’m sure.

1 Like

#5

I’d like to create a second text-highlighting insert that works just like this one created by Odatnurd, but with different tags (# # instead of < >) and a different color, and bound to a different key combo. But I can’t get my head around the syntax definitions documentations enough to make it happen and would appreciate any tips.

Since I’m always (more or less) going to be using the txt syntax, I assume the new one will also be in that same sublime-syntax file.

Thanks for any pointers.

0 Likes

#6

The same construct as above can be duplicated and just slightly altered in order to do something like this.

First, if we focus in on this part of the syntax example I provided above:

  main:
    - match: '<'
      scope: punctuation.definition.note.begin
      push: note

  note:
    - meta_scope: note.text
    - match: '>'
      scope: punctuation.definition.note.end
      pop: true

Syntax definitions contain more or more context sets that each specify a set of rules that are applied in order to match text and determine the structure of the file. There can only ever be one active context at a time, and only rules in that active context are used; all other rules in other contexts are ignored.

In this example, there are two contexts; main and note. There’s always a context named main, which specifies the rules that are in effect initially. You could think of this as the place where the “program” that is the syntax matching starts.

In addition to this, contexts are managed on a stack. If you’re unfamiliar with the concept, think of a stack of plates at the end of a buffet; There are a lot of them there, but you can only take the plate off the top of the pile. If you put a plate on top, the next person that comes along has to take that plate before someone can get to the plate underneath, but you know specifically what plate will come next.

The operations you can do in a syntax definition regarding a context is push, pop and set (set is not visualized here).

  • push means “put a plate on top of the pile”
  • pop means “take a plate off the top of the pile”
  • set means “take a plate off the top of the pile, then put a new plate on top” (that is, it is the same as doing a pop followed by a push).

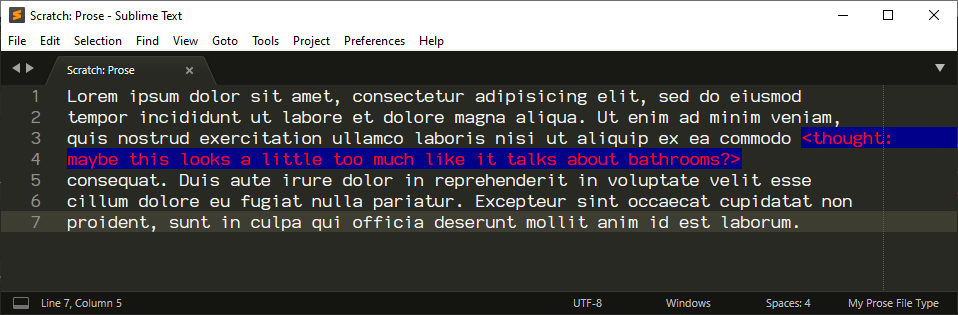
When the syntax definition starts parsing your file, it starts with the match rules defined in the main context. There’s only one thing that it recognizes, and that’s a < character. Anything that’s not that character doesn’t match a rule and gets no special treatment.

However, when it sees a < character the rule hits. The scope applies data to the matched text to tell color schemes how to color it, and then there’s a push.

The push changes the active context from main to note; now the rules in main are ignored and only the rules in note are active. Here the match rule is very similar to the other one, only when it sees the special character > the action it takes is to pop instead of push. That tells the syntax engine to go back to the set of rules that used to be active before this one (or if you will, it’s “removing a plate” from the stack, revealing the main plate).

So, replicating this is more or less a matter of adding an extra rule in main that matches a different character (say #) and a new context that has a rule that recognizes the ending character (say #) and does a pop. There’s one extra gotcha here, but lets skip that for a second.

If you’re going to have multiples of these, we could rewrite the original example to look like this instead:

  main:
    - match: '<'
      scope: punctuation.definition.note.begin
      push:
      - meta_scope: note.text
      - match: '>'
        scope: punctuation.definition.note.end
        pop: true

Here there is only one context, main. Everything works as it does in the original, except that the push is pushing an “anonymous” context. We can see here that the indentation changed a bit, but the lines under the push are doing exactly what they did in the previous example.

This sort of thing isn’t necessary, but it can make reading the resulting syntax a bit easier. Here we were creating a whole context just to have a single rule, so it’s a bit clearer to just see exactly what’s going to happen all in one place.

Based on this, you could just duplicate this rule and change the match rules as appropriate; for example:

    - match: '#'
      scope: punctuation.definition.note.begin
      push:
      - meta_scope: note.text
      - match: '#'
        scope: punctuation.definition.note.end
        pop: true

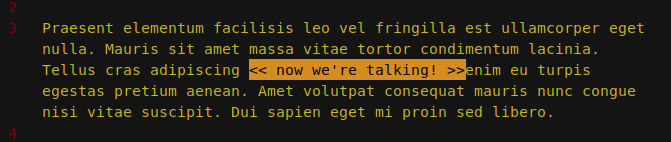
This match rule does the same as the above, but uses different characters. It’s also self contained.

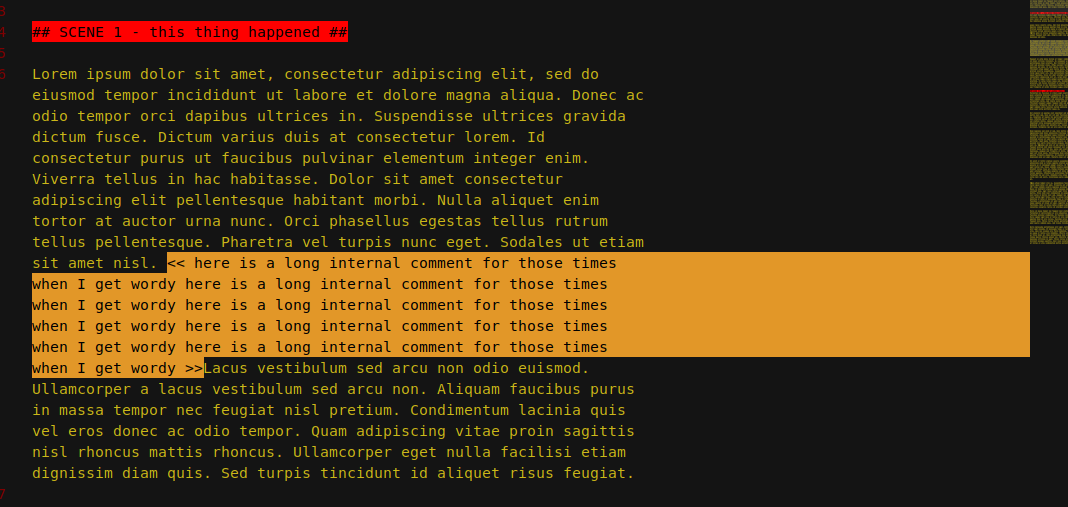
Adding this will sort of do what you want, except for that “Gotcha” I mentioned above. This rule applies the same note.text scope to the text as the first rule does, which means that as far as the color scheme is concerned the two kinds of notes are identical, so they’ll appear in the same color:

In order to apply different colors, each item needs to have a distinct scope applied to it, so you would need to adjust the syntax definition to take that into account.

With the changes explained here, the original example would become something similar to this:

%YAML 1.2
---
# See http://www.sublimetext.com/docs/3/syntax.html
file_extensions:
  - prose
scope: text.prose
name: My Prose File Type
contexts:
  main:
    - match: '<'
      scope: punctuation.definition.note.one.begin
      push:
      - meta_scope: note.text.one
      - match: '>'
        scope: punctuation.definition.note.one.end
        pop: true

    - match: '#'
      scope: punctuation.definition.note.two.begin
      push:
      - meta_scope: note.text.two
      - match: '#'
        scope: punctuation.definition.note.two.end
        pop: true

Here we’ve added one and two to the scopes in each item to create a note.text.one and a note.text.two. If you have specific notions about what each style of note is meant to represent, you could replace one and two with different terms to make everything clearer (or maybe it’s just about the colors :slight_smile:).

With the new syntax rules in place, you can add in extra rules in your color scheme to be able to match them.

For example:

        {
            "scope": "text.prose note",
            "foreground": "red",
            "background": "darkblue",
        },
        {
            "scope": "text.prose note.text.two",
            "foreground": "white",
            "background": "darkgreen",
        },

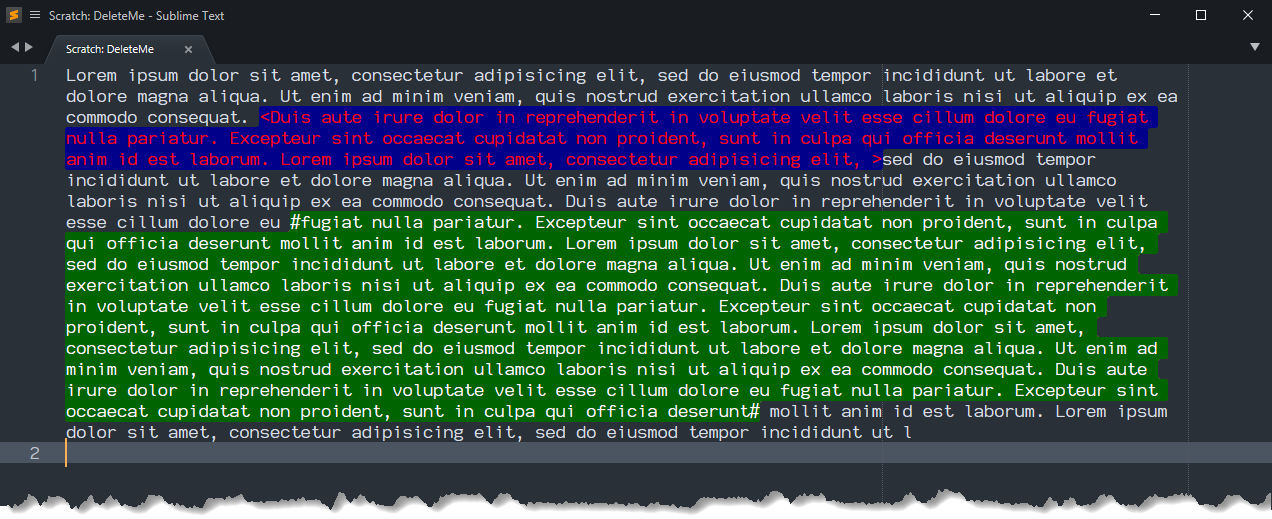
This is just the content of the rules part of the color_scheme example I gave originally, and the first rule is still the same. There’s now also a second rule that specifically matches note.text.two, so it will catch the notes of that type. The other rule is less specific, so it applies to note.text.one and colors things as before:

5 Likes

#7

Thanks so much for that great explanation. I’ve read it through, and I understand the overall picture. Tomorrow morning I plan to sit down with it and implement it here on my system. Your introduction to syntax definitions will definitely help me get more out of the official documentation, too. I was pretty much swimming around there. Thanks again, man. I’ll report results tomorrow. I really appreciate you, Odatnurd.

0 Likes

#8

I’m happy to report success with this new arrangement, thanks to your excellent advice, OdatNurd. I have not yet got my head fully around exactly how that syntax definition is doing its thing, but I’m getting there. Got stuck on the “scope” component and have begun reading up on that.

In any case, below is a shot of the two in action. The yellow one is for internal comments I make as I’m working on a piece. The red ones are the new ones. They’re going to function as scene headers. I’m working now with one chapter per file–could be 4-5000 words–and being able to mark where new scenes begin is really helpful, and it makes the minimap more useful to me, too.

I would appreciate your opinion about some of the small tweaks I made to your code, but I don’t know how to post well-formatted code here on the forum, and I’m not finding that info by search. Can someone please point me to instrux for posting code here?

Again, OdatNurd, you’ve done a tremendous job. Thanks for being so generous with your time and expertise.

2 Likes

#9

There an Unofficial Guide that does a good job of explaining the various things you can do to format your posts in Discourse, but if you happen to know Markdown, it’s pretty much that.

1 Like

#10

mmm… i’m having troube formatting the code–I’ve got some double angle-brackets in there, and it keeps wanting to change those for me. :slightly_smiling_face: In any case, everything’s working fine, so there’s no need to take up your time with it. As I learn more, the mysteries will probably resolve. If I hit another bump in the road, I’ll shout. Again, thanks so much for the high-quality help. :grinning:

0 Likes

#11

A non-urgent but related question here: Is there a simple tweak that will make the highlighted-comment wrap at whatever the current wrap-width is? It’s not a huge deal, but would be cool if so.

Pic of current functionality:

0 Likes

#12

Not “the right way.” There’s a nasty hack you can try if your text is hard-wrapped, rather than soft-wrapped. This involves detecting newlines inside your notes, giving them a scope, and setting the background back to your normal background.

    - match: '<'
      scope: punctuation.definition.note.one.begin
      push:
      - meta_scope: note.text.one
      - match: '>'
        scope: punctuation.definition.note.one.end
        pop: true
      - match: '\n'
        scope: constant.character.newline
        {
            "scope": "text.prose note.text constant.character.newline",
            "background": "black",
        },
0 Likes

#13

Thanks, Michael. I appreciate the thought, and that’s an interesting solution. My text is soft-wrapped, though. (At least I think it is…) That said, I’ll try this out tomorrow when I’m at the right machine.

0 Likes

#14

Michael, I implemented this change this morning, but no dice. I assume it’s because I’m using soft-wrap. I appreciate the effort, though. :smiley:

0 Likes

#15

Just to put a bow on this question, can I assume it’s not possible, if I’m using soft-wrapped text, to make the highlighting (developed earlier in this thread) stay within the bounds of whatever my current wrap-width is? See pic above. Overall, the highlighting solution is working great. This tweak would be purely for aesthetic/OCD reasons. :slight_smile:

0 Likes

#16

For soft wrapping I’m pretty sure this is not possible, no

0 Likes

#17

You could use view.add_regions; that one makes the background color stay in bounds. It’s odd that these two features behave differently in that respect.

0 Likes

#18

Thanks, folks. Rwols, can you say just a bit more about your note. I’m not a programmer, but I can learn to tweak things. Where/how would this view.add_regions be implemented?

0 Likes

#19

Can anyone help me implement rwols’ view.add_regions suggestion, above? I’ve tried it in various ways in the comment.sublime-syntax file, but I can’t figure it out.

0 Likes

#20

It’s not something you do with a syntax (or rather, not just a syntax), it’s something that you need to do with a plugin. Ironically the video I’m currently finalizing for upload tomorrow actually talks about this very thing.

First, you want your sublime-syntax to define the scopes that you want, like it’s currently doing (for our purposes here, we’re going to assume the example from my last post above that has the two different kinds of notes in it).

Next, when it comes to the part where you modify the sublime-color-scheme to add scopes, it’s important that you NOT set the rules to have the “proper” scope; if you do, the colors will be applied (as they are right now) which is not what you want. So, you might define your rules like this:

{
    "scope": "noteone",
    "foreground": "red",
    "background": "darkblue",
},
{
    "scope": "notetwo",
    "foreground": "white",
    "background": "darkgreen",
},

The ultimate goal is to have scopes that are unique, but not something that will natively match any rules in any syntax (unless you want the color applied to them, of course). With very few, narrowly defined exceptions, plugins can’t apply a color to something unless there’s a color scheme rule for it. If you want full control over the colors used, you need to have them in a color scheme.

Then, you need to have a plugin that does some work for you. Specifically, the code has to examine the content of the file to find things that look like notes (which it can do via the scopes applied in the sublime-syntax file), and then use that information to apply colored regions.

The gotcha here is that this information is not dynamic like color schemes are; regions are only applied when you ask. This means that when you open a file, they won’t be there, and if you add a new note, it will not be there either. Similarly if you delete one of the characters that ends a note, the region will remain in place even though it’s not technically a note.

To get you a started, here’s a plugin that does this:

import sublime
import sublime_plugin


class NoteViewEventListener(sublime_plugin.ViewEventListener):
    @classmethod
    def is_applicable(cls, settings):
        # Make this listener only apply to files with this syntax
        return "Prose.sublime-syntax" in settings.get("syntax")

    def _update_regions(self):
        # Find all of the locations in the file where note scopes appear. This
        # uses the scopes as applied in the syntax.
        note_one_notes = self.view.find_by_selector('note.text.one')
        note_two_notes = self.view.find_by_selector('note.text.two')

        # Apply regions to the view.
        #
        # The first argument is a unique "key" that identifies the regions
        # being added. Reusing the same key replaces the regions; this calling
        # this more than once causes the regions to update to what was found
        # above.
        #
        # The second argument is the list of regions to apply
        #
        # The third argument is a scope that indicates what colors to use
        #
        # The flags indicate we don't want an outline on our notes, and that
        # they should persist in the file across sessions.
        self.view.add_regions("note_one", note_one_notes, "noteone",
            flags=sublime.DRAW_NO_OUTLINE | sublime.PERSISTENT)
        self.view.add_regions("note_two", note_two_notes, "notetwo",
            flags=sublime.DRAW_NO_OUTLINE | sublime.PERSISTENT)

    # When a file is loaded, update regions in it; regions don't persist across
    # files being closed and opened (although sublime.PERSISTENT makes them
    # persist in the session information if you quit and restart Sublime)
    def on_load(self):
        self._update_regions()

    # Any time the file is modified, re-run the check to see where the regions
    # are and update them.
    def on_modified_async(self):
        self._update_regions()

The on_load event triggers when a file is loaded and on_modified_async occurs whenever the content of a file is modified. The is_applicable() makes these events only apply to files that are using the Prose.sublime-syntax syntax definition, since it’s unlikely to be helpful in other cases.

When either event triggers, it calls the _update_regions() method, which asks Sublime to tell it all of the locations where each kind of note appear, followed by visually marking up the regions in the buffer. Here is where we give Sublime the scope that it should use to apply the color. This isn’t the scope of the actual text; it’s used to look up what rule to use in the color scheme to get the color.

The result is something like this; as you can see, the colors are applied, but the region colors apply only to the text and not the buffer background as a whole:

This could stand for being smarter; the regions are updated every time you modify the buffer, which may cause a performance issue. A better implementation would probably be more intelligent and only do this if the text that was changed appears to have added or removed text that could affect the status of notes, etc.

Alternatively, you could modify this so that it applies the regions to files as they’re opened and when you use the key binding that adds a new note, but otherwise does nothing. This would be more performant (and manual), but would work well if you only ever use your key binding to add a note.

2 Likes

Where to hire someone to make plugin?